
WE OFFER SOLUTIONS FOR YOUR MACHINE PROBLEMS
Come to us for more than just parts; we offer real help and information from a real, live person with experience. We are dedicated to going the extra mile to assist you.
What do you do if the Lincoln SA200 and Miller Continental F-Series engine won't start?
Finally, clear, crisp information that you can use to troubleshoot, repair, maintain, and upgrade your SA-200-F162, SA-200 F163, and SA250-163 Welders.
“I am, as I've said, merely competent. But in an age of incompetence, that makes me extraordinary.”
Billy Joel
YOUR ENGINE WON’T START-DOWN AND DIRTY QUICK TROUBLESHOOTING YOU CAN DO IN THE FIELD.
-TROUBLESHOOTING GUIDE-
Engine Won’t Start? Start Here.
Step 1: Do You Have Fuel and Spark?
For the engine to run, you must have good fuel and a proper ignition spark.
Step 2: Check the Battery
Before we begin, you need a good, hot battery. We'll check the
voltage later; if it spins the engine fast, so much the better.
If you have any doubts about your battery, jump it to another
good one:(positive to positive/negative to negative).
You should have plenty of power for now.
QUICK TEST:
-
Turn the ignition switch OFF.
-
Spin the starter for 30 seconds.
-
The starter should not slow down or bog down.
-
Feel the starter — it should be warm, not hot.
If it’s hot, it’s weak and/or dying. Not enough spin = no start.
(The #1 cause of starter failure is weak batteries.)
REPLACE the starter and probably the battery too.!
Step 3: Cheap and easy ignition check.
1. Remove the air cleaner.
2. Ensure your ignition switch is in the "ON" position.
3. Spray a short burst of starter fluid into the carburetor intake. Less is better!
4. Spin the starter; if the motor "hits" and tries to start. You have some spark. You need to address the fuel/carburetor condition.
GO TO STEP 5
5. Check to make sure the fuel is good. From the tank, pour a few drops on the cement and light it. If it is good, it flares up and burns for a second.I have seen new fuel "spoil" in a gas can in 8 weeks. It's the ethanol, it's an oxidizer, and it will corrode cast iron or steel. If you have any doubt, drain and clean the fuel tank
Step 4: Cheap and Dirty Way to Confirm Good Spark & Simple and Easy
-
Remove all your spark plugs. (It takes the stress off your starter)
-
Are they wet or smell like gasoline? If yes, you're getting fuel into the engine.
-
Clean a spot on the exhaust manifold using a wire brush to make a shiny metal surface.
-
Lay the plugs in the order you removed them so that you can replace them correctly.
-
Insert a #6 Phillips screwdriver into each spark plug wire — one at a time.
-
Have someone spin the engine while you hold the screwdriver shaft near the cleaned spot on the manifold.
-
You should see a bright blue spark (not white, yellow, or green) jump to the metal, with a sharp popping sound.
-
-
No spark or weak spark? You have a failure. Stop here until you fix your ignition problem.
If you have a magneto, have it serviced or replaced. If you are determined to use a magneto, your going to have to two things; Buy adn keep a spare or brcome a magneto mechanic-quickly. Plug wires—if they are corroded, replace them; your time is more valuable.
Point and Electronic distributors; Cheap and easy tests.
a) Attach a jumper wire, normally test wire with alligator clips
on each end from the alternator (+) lead, normally attached to the
large battery wire on the starter solenoid, to the (+) terminal
on the distributor coil. The electronic ignition system thinks it's
running, if you accidentally start the engine,
You have to yank off this wire to stop it!
b) You have to have 12.0 volts or higher for the electronic
ignition to work. If you don't stop right now, you have
electrical problems (battery or connections); fix them now.
c) If you have a test light (it's easier to use by yourself,
or you can use a DC meter). Spin the starter; if the test light
stays on with no flicker, your module is defective. As you
spin the starter, the test light should go bright then dim,
over and over. The voltage will increase and decrease on
the meter. This test works with points distributors too.
NOTE: These modules are reliable; what kills them is the cheap
coils with a primary resistance (across the two small posts
3 ohms or more.
Step 5: Spark is Good — Now What?
-
Reinstall the spark plugs.
(If you're unsure about their condition, replace them. They’re -
Cheap and not worth gambling on.)
-
Check for fuel leaks:
-
Is gasoline leaking out of the intake side of the carburetor?
-
You may need to remove the air cleaner to inspect.
-
Turn off the fuel at the tank.
-
-
Remove the fuel line going into the carburetor.
-
Run about a pint of gasoline into a glass jar.
-
It should be clear, not murky.
-
Pour a few drops on the cement and light it
-
It should flare and burn brightly for a second.
If you have doubts about the fuel:
-
Drain the tank.
-
Refill with fresh gasoline.
-
Clean the bottom of the tank using a clean cloth.
-
Leave a little gas in and reach in (or have someone with a smaller arm) through the filler neck to wipe it out.
-
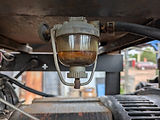
Disassemble and clean the glass fuel bowl.
-
Don’t be surprised by what you find.
-
-
-
Once you’ve confirmed clean and consistent fuel flow to the carburetor, it’s time to check the carb itself.
Is It a Carburetor Problem?
-
Does gasoline spurt out of the intake when the engine spins?
→ If so, replace the carburetor.
We do not rebuild most carbs. It’s labor-intensive, and parts are expensive (if you can even find them). Just buy a new one with a warranty. If you are going to depend on the machine to make a living, buy a spare and keep it in your truck!
-
Still want to rebuild it?
→ Wait until you have a replacement in hand first.


Connect the test wire
No Good! Clean the bowl and tank!